Monday, May 30, 2011

It's A Wrap!

It's the moment you've all been waiting for!!!


*Drum roll*


It's the one!


*Faster drum roll*


The only!


*Super fast drum roll*


RATATOUILLE FINALE!!!!!! 


*Lots of clapping and cheering and whistling and hooping and hollering, et cetera et cetera*


Yes, it's true ladies and gentlemen! Finally, you will see the final product that has been on your hearts and minds for so long now!


But first, I gotta do it step by step before showing you the end (; And the final product included cupcakes and cakepops, so hang in there, because we'll get around to it.

Just kidding.

Here you go (:


It looks pretty sweet (: It got a LOT of compliments at the party, which made me happy (:


Wrapping things up was fairly simple. All I had to do was make the picnic mat, the menu, and put borders around the cakes.

Starting off with the mat, first I cut up a lot of red and white squares (2x2). I arranged the red squares on the mat (see how it has measurements on it to help me out? It's awesome :D), leaving space for the white squares. 


Then I arranged the white squares inside the red squares


Then to make it one piece of fondant instead of a lot of individual squares, I rolled it together. Now this was a doozy. I forgot to put some shortening on the mat so it wouldn't stick. So after rolling it, it took me forever and a lot of help from my mom to get the picnic towel off of the mat and onto the board. My recommendation? If you're gonna make a mat this way, go ahead and do it straight on the board.


The final towel still looked sort of nice though. But it had a lot of imperfections which I later covered up with veggies. The next step was giving the cakes a border. I didn't take any good pictures of that, but here's a picture at an angle that you can see the borders from.


The pot's border was time consuming, but it looked good. Initially I wanted to make it flames, but I decided that I didn't want to go through the trouble, so I did my favorite shell border, multi-colored. Then the cheese's border was just the Tip 3 all the way around.

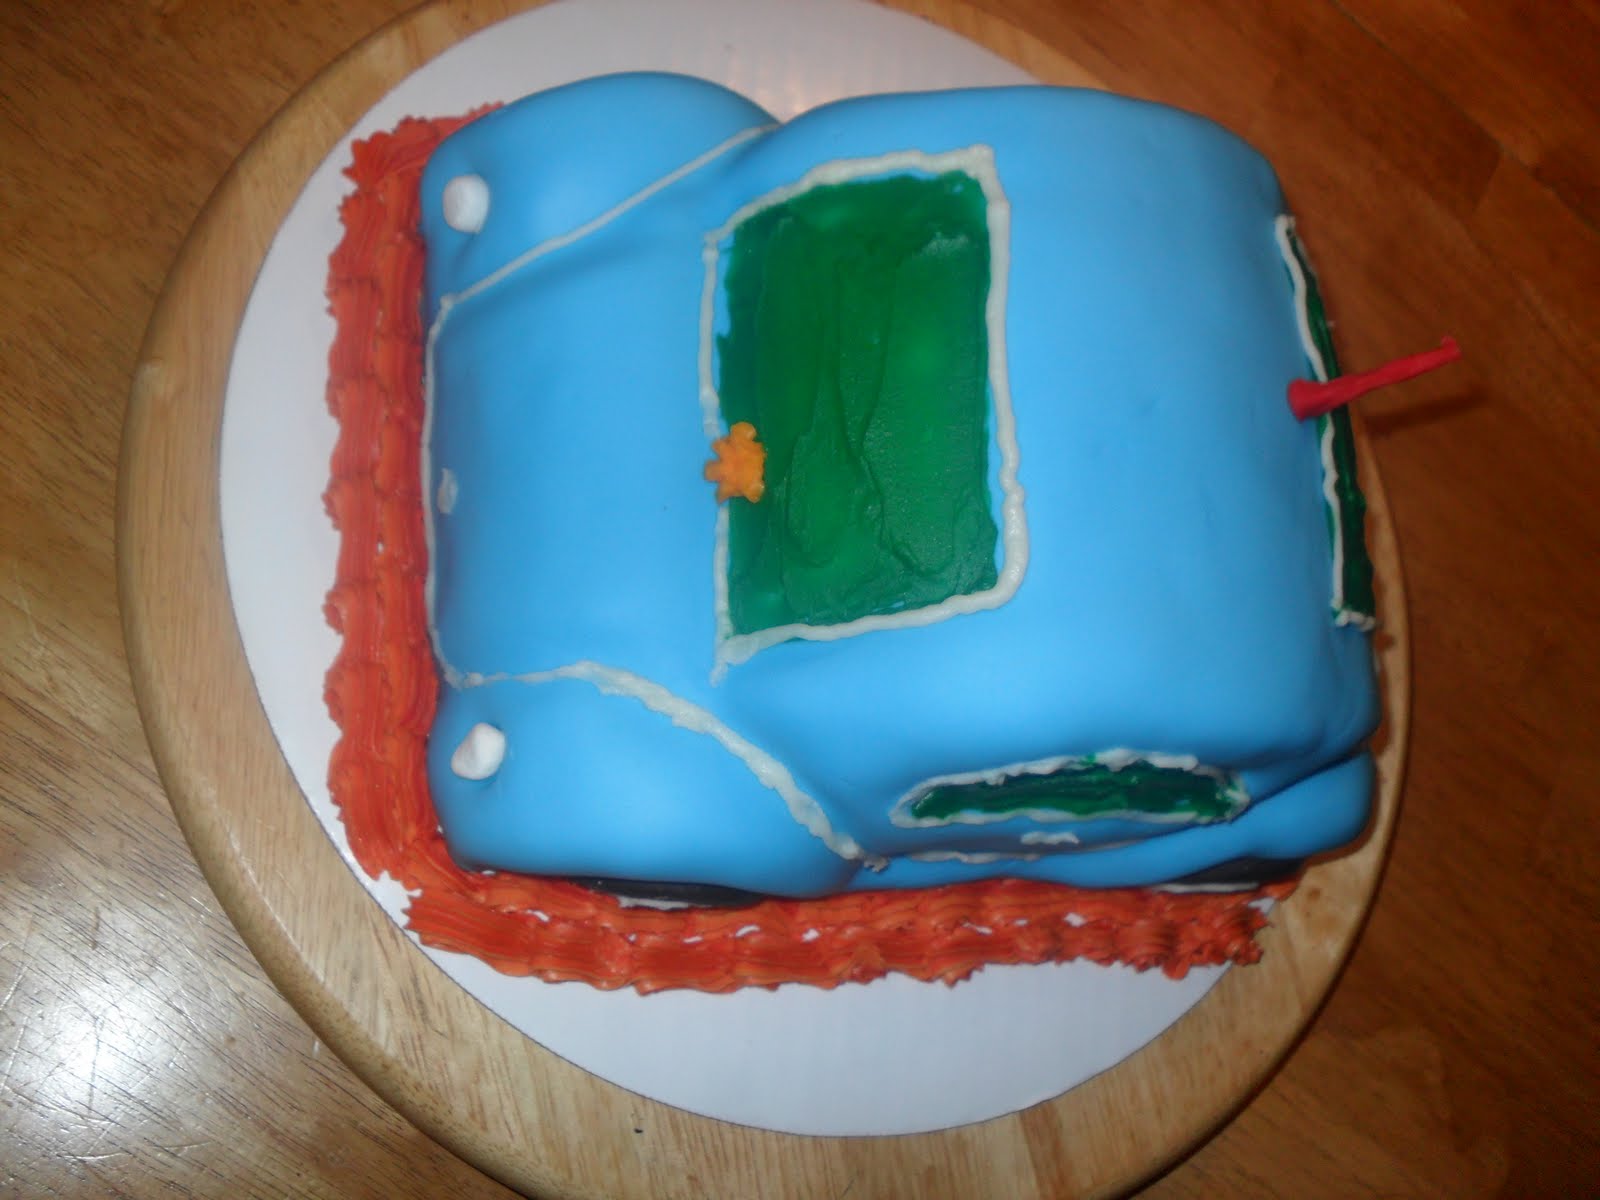
Next was the menu. I cut out a rectangle* from a dark color, then I made a border for it using an orange-y copper color.


Then all I had to do was write on it and I went with the tiny jagged end roller that I used on the cake purse  to create a border. It looked pretty cool and it saved the cakes from any writing**

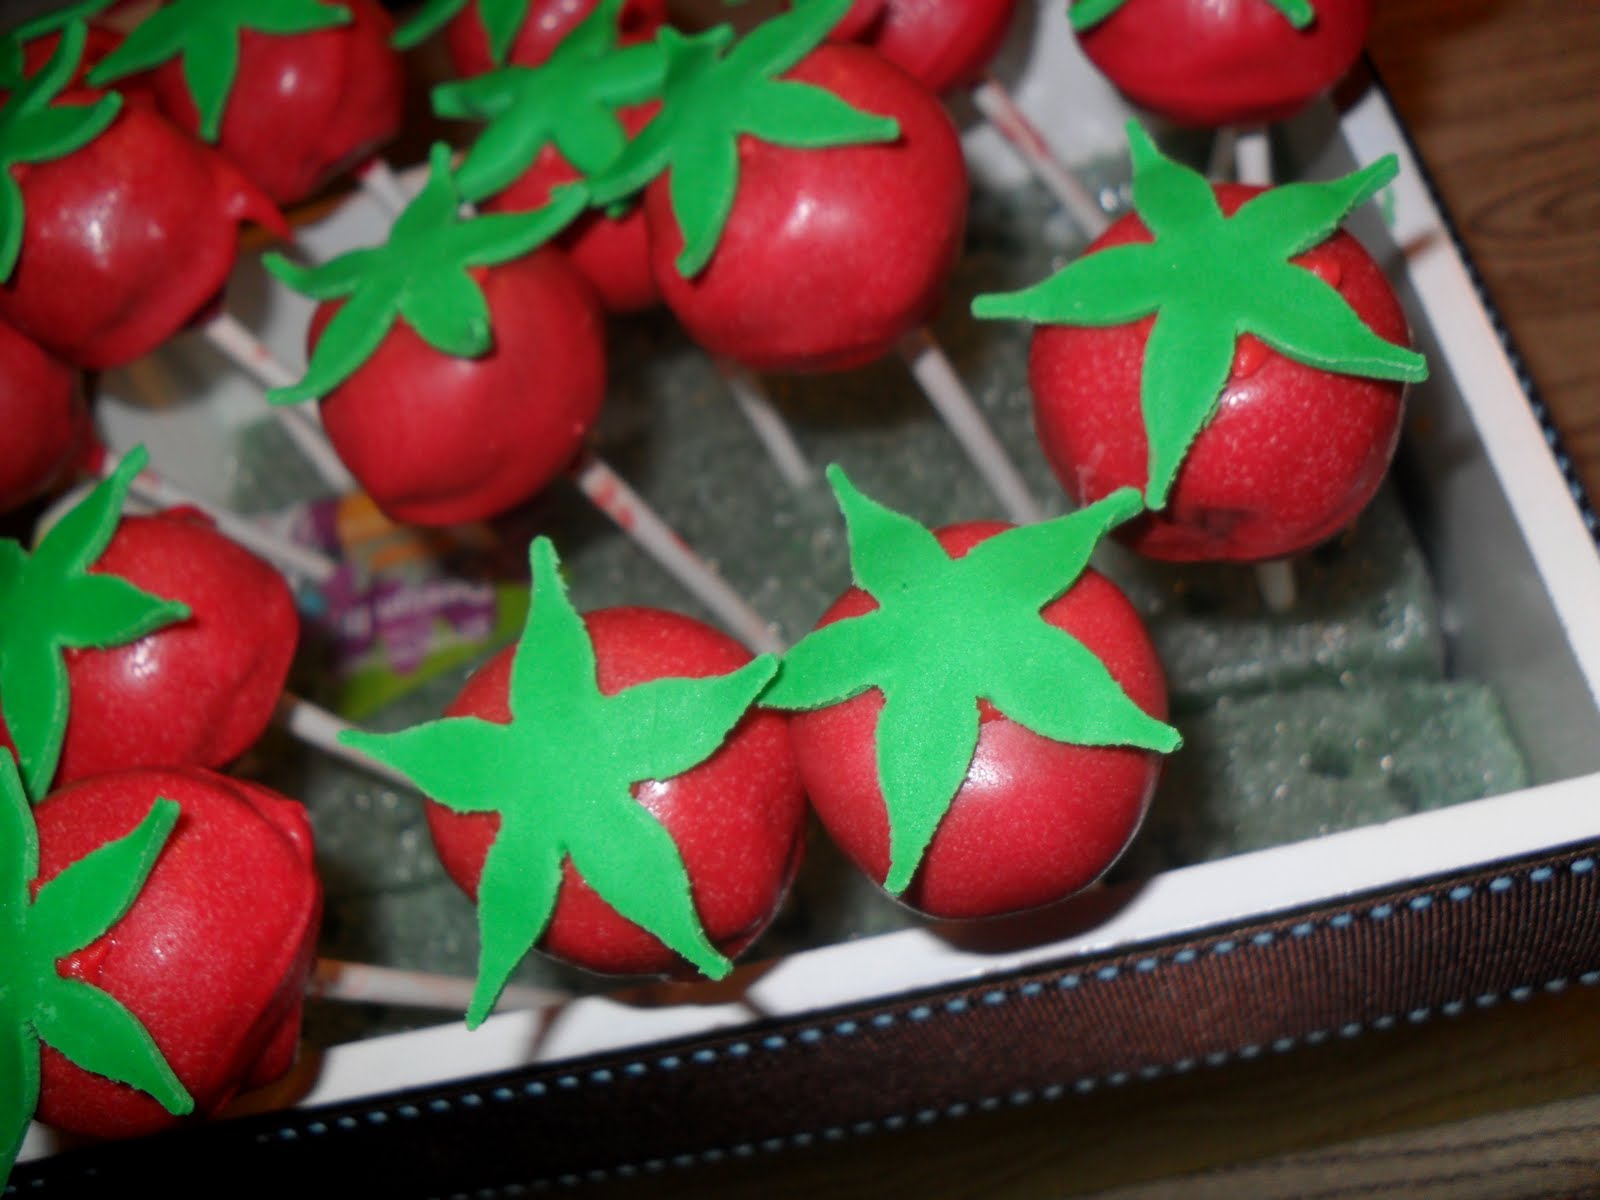
Remy and the veggies were already ready, so the rest was really just a matter of arrangement. The main focus was covering all of the imperfections on the picnic mat. So first Remy got placed in between the two cakes


Then the veggies just got tossed around conveniently wherever there was an oopsie.


Some of course where just placed wherever for aesthetics.


Veggies all over the place!


I think in the end, it looked quite nice


What do you guys think? (:


I always love to hear some feedback (:


*Can you tell that it's the same fondant that made Remy?
**I hate writing on a perfectly good cake. It just ruins it. Some cakes need writing, cause they're made that way, but pretty sculpted cakes or cakes that are meant to be something (like a cheese or a giant pot) shouldn't have writing -_-

Tuesday, May 24, 2011

Ratatouille Miscellaneous

And we continue with Ratatouille!!!

This isn't quite the last post for Ratatouille. This is for all the extra stuff that accompanied the cake (like cupcakes and cake pops). But i promise that this post will be super small. Especially since most of the cupcake stuff is already done (;

Usually just the cake is suffice, but since I was doing the whole cake table for the party, I went all out with it (:

Now, I'm sure you all remember the veggies and the cooking tools from my first few posts. Well, the veggies got spread around between the cakes, the board (you'll see that on the next Ratatouille post ;D), and the cupcakes. And the cooking tools all went on the cupcakes (:

So once you know how to make the veggies and the cooking tools, making these cupcakes is easy peasy. All I did was use the Tip 1M to create the swirly effect on the cupcakes. It's very simple. You start on one end of the cupcake and you work your way around the edge, moving towards the center. As you move with the tip, keep squeezing, and once you reach the center, release and pull up. Now, I like just doing this one layer, but Wilton teaches to do a second layer. You can see their instructions here. The way they do the first layer is the same way I do mine, except I squeeze more to make more icing come out and make the center larger.

Once I had my pretty swirl, I squished the tip with one of my veggies or cooking tools. So my cupcakes looked all pretty and Ratatouille-y like


Here's a close up


Another one:


I took the bowls and put icing in them too, to make it look like there was actually food in there, and it doubled as something to make the spoons stick.

Here's our last close up of the cupcakes (:


But cupcakes aren't all that were made! Cake pops made a scene too!

Instead of using regular chocolate to dip my cake pops in, I used colored chocolate* to make pretty red pops.


And to keep with the Ratatouille theme, I cut out some little fondant leaves and glued them on the pops to make pretty tomato pops


And those were our tomato pops! =)

That's it for this post folks, stay tuned for the ultimate Ratatouille finale!!!!


*I don't know how you make brown chocolate into red, so I just went ahead and bought already colored chocolate. But if you're gonna use white chocolate or vanilla, try coloring it.

Saturday, May 21, 2011

Pop Goes The.... Cake?

Ladies and gentlemen, I am pleased to announce that I am back from Argentina!

I had the time of my life there and learned a lot from the conferences. We didn't win any prizes, but we did make a lot of friends and learned a load of useful life lessons (: I hope I get a chance to go back next year!

Unfortunately, as soon as I got back from my week of fun, I got sick =( I toughed it out on Monday and Tuesday and got caught up on all my school work. But on Wednesday I caved in and stayed home sleeping, and when I went to doctor on Thursday I found out that I have strep throat =O So I slept it out yesterday too.
And today I feel just like Hercules!!! ... In that scene when Hades takes away all his god powers and he can barely walk.... Yup, I love meds (NOT).

But anyways, enough complaining. It's time for me to return to you, my lovely blog readers (:

Today's post is all about cake pops!

Now what is that, you ask? Well, just to be short, it's a delicious mouthful of cake, in lollipop format*

Yes, it is. A beautiful, little convenient bite of cake. Icing included (;

But how do we make this delicious fun-sized cake? Easy! I'll teach you how in 6 easy steps! Crumble, Ice, Stick, Cover, Sprinkle, and Enjoy =)

Step One: Crumble

Now this part is what makes cake pops so convenient. They're made out of cake crumbs. So you can just use the pieces of cake leftover from when you carve or even out a cake. Or you can just bake a whole cake and crumble down the whole thing. I like sticking it in the Kitchen Aide for a while and just taking the crumbs out.. Like this:


Step Two: Ice

The next step is taking some icing and mixing it well into the crumbs. You want there to be enough icing so that all the crumbs stick together and work almost like playdoh. It's going to end up looking like a big blob of cake.


Then, using a spoon or an ice cream scoop, make little balls out of the cake blob and put them on a cookie sheet. But make sure to cover the cookie sheet with wax paper or aluminum foil first!


Step Three: Stick

Once you have all your little chocolate balls, refrigerate them for about 15 minutes so they keep their ball shape. During these 15 minutes, melt some chocolate. Because once you take the balls out, you're going to dip the sticks into the chocolate, about three fourths of the length of the cake balls. Then ever so gently insert the sticks into the balls, 


And now you have pops! Place them back into the fridge until the chocolate is hardened.

Step Four: Cover

Once the chocolate on the stick is hard and the stick doesn't come out of place, you can take them out again. Again, you're going to need melted chocolate to dip the pops in. Now here's a commonly made mistake, do NOT dip the pop straight into the chocolate, or else the chocolate will get all cakey and it'll be icky to work with. So get a spoon and just use that to spread the chocolate on the pop. Use the spoon to even it out nicely.


Isn't it purty?

Step Five: Sprinkle

Now, as soon as you're done dipping the pop in chocolate, you need to sprinkle it, or else the chocolate will get hard and it won't stick. I think sprinkling is pretty self-explanatory? Just get a spoon and pour sprinkle all over the pop (: 


And once you're done sprinkling, just set it somewhere (in upright position) to let the pop dry. I like floral foam personally. I cover it up with aluminum foil so the green stuff doesn't make a mess. Then I just leave it there drying for a while until the chocolate is hard.


Once it's dry, I can either wrap it up for transport, 


Or I can just move on to step six and enjoy (;

Step Six: Enjoy

So now you can just sit back, relax, and eat to your heart's content!

Courtesy of Don't Unfriend Us


*Which does NOT mean you should lick it. It's still a cake people.

Friday, May 6, 2011

Happy Birthday To Me (:

It's my birthday!!!

Or at least it was on the 2nd.

And in commemoration of my special day, we went to Chuck E. Cheese's on Sunday =)

No, I'm not an elementary schooler, I'm turning 17. But, I decided that since this is my last birthday as a 'kid' (cause next year I turn 18 and that's a legal adult), I wanted to do something childlike, like have a birthday party where a kid can be a kid (:


Yay!!! =D

So I'll warn you now, this post doesn't have much to do with cakes, except for the cake Chuck E. Cheese gave me:


Flotsam decoration and randomized sprinkles. Along with candles that didn't all fit around the border. But I'm not here to criticize their cake, because I enjoyed my time there too much (: I didn't eat any though (Unless you count my friends shoving my face into my slice as 'eating').

I had an awesome time at Chuck E. Cheese's on Sunday (what isn't awesome about getting hit on by Chuck E. then watching him flick your boyfriend off? lol). It was definitely a day to remember (:

Then on Monday I got to go out with my baby (: First we went to his house so I could drop off his little twin sisters' birthday presents (yea, we share a birthday. How awesome is that? =D). And surprise surprise, inside was a cake waiting for me!!! The first cake he's ever made got to be my birthday cake (: I feel special! Then we went bowling and to Longhorn Steakhouse. Finally, when we got home I had a second cake waiting for me.
As any other 17 year old, I asked for a car as a birthday present, so my mom got me a gorgeous blue Volkswagon (:


Isn't it cute??? Too bad I can't drive it =/ But it even has my name on the license plate!


My mom spent all weekend making me this car (: It was really sweet of her (:
And I got earrings from my boyfriend and a Coach purse from my little brother (He was saving up for that for a loooong time). All in all, it was a great day =D


But now for some news. Tonight I will be flying away to Argentina. I'm going for an international competition with Junior Achievement. I will be there for the next 10 days, so I won't have another post for a while. But I'll finish and post the Ratatouille post when I get back. Be on the lookout next week.

But until then, pray for me that I do well in Argentina!

Saturday, April 30, 2011

Who Cut The Cheese???

Yes, this is another Ratatouille post. Because after all, we all know that mice and rats love cheese! And so do the Parisians, and the movie is set in Paris. So it's only logical that we have a cheese cake in our Ratatouille ensemble!


And by cheese cake I mean a cake that looks like cheese, not an actual cheesecake. I have yet to learn how to make those. Hmm... Maybe that'll be the next learning project on my list*

This cake was made using a normal 9 inch round pan. Then I froze the cake, as is the norm, then after it thawed I cut it in a cheese shape and iced that Swiss-erooni.
Then I covered it up in some cheesy fondant and got this lovely guy:


Up until this step, all cakes tend to be the same, with a few differences, including flavor, filling, shape, and size. The steps are: bake, cool down, freeze, thaw, ice (or ganache), cover with fondant (or apply top layer of buttercream) and voila, you have the first step of the cake and you are ready to decorate, which tends to be the hard part. But our lovely little cheese cake here was nicer to us than that. The hardest part was putting fondant all the way around on such an interestingly shaped cake.

Why was the decoration of this cake so easy you ask? Well, because all i had to do was poke some holes.


That cool little green thing right there is what I call a ball tool. It's very useful to make flowers** and holes. So, I used that little baller to poke my cheese (:


So after enjoying myself far too much***, I had this beautiful block of cheese! For a finalizing touch, I put on a wooden cutting board. Yes, I do know that cheese normally doesn't go on cutting boards, but usually rats don't cook either, so take that =P

And of course, the wooden board was cling wrapped to protect the cake (:


Making cheese cake was by far the easiest part of our Ratatouille ensemble, which made me very happy, since the rest of it was so challenging. Not that I don't love a challenge, but I can only take so many challenges in one cake. Arms falling, mats peeling****, coloring brown fondant, arms falling, eyes, hands, feet, arms falling, tails, handles, veggies, arms falling, et cetera et cetera. So the cheese cake was a nice easy deviation from the difficulties of Remy's life.

So here's the cheese cake on the final piece.


Just a little taste to keep you going (;
So come back later to enjoy the Ratatouille finale!


*Which is pretty long, so don't hold your breath for that post.
**I'll explain later.
***Who would have known that poking a cake is that much fun when there's no chocolate icing?
****You'll find out on the next Ratatouille post (;

Monday, April 25, 2011

Happy (politically incorrect) Easter!!!!

A very happy Easter to all of you! Or Passover, whichever one you celebrate. Or, if you don't celebrate either one, you can take this post as a spring thing too (; Or, if you hate spring, it's just a floral post. And if you hate flowers as well... Then there's nothing I can do. Go reread a non-floral/springy post.
See how I appeal to all people? I can be very politically correct when I want to (;

Let's stray away from these political correct/incorrect things and start our cake. Because no matter what, cake is ALWAYS correct (;


Here is our lovely ganached cake. I think I have gotten considerably better at ganaching ever since our Mini Cake disaster. The lines are there on purpose.


Because that pretty plastic paper underneath is a guideline for this pretty design called a basket weave. Just to give you an idea on what that is, here's my practice board for it:


It's going to make the cake look like a basket. (: So with the guidelines on the paper, I made marks on the cake to provide a guide for the basket. 


Then on one of those lines I drew a long icing strip using Tip 47*


Then on that line I drew a horizontal line across it. Pay attention now, or else you'll miss it. The horizontal line will be drawn across the vertical line, half of it on either side. Then underneath of the end of either side of the line, there's a little dot. Then once the lines are drawn all the way down the side of the cake, another vertical line goes above the end of the lines. And you go again.


This is just a quick overview on the basket weave**, but I'll explain step by step with better pictures on a later date. After a long painstaking time icing the cake, it turned out like this:


I also used Tip 22 to create the shell border at the bottom and Tip 16 to create the shell border on top.

And of course, no cake looks perfect without a couple of touch ups. So to stay in the Easter/spring theme, I chose flowers***. And I pulled out my handy dandy fondant to make some flowers. (;
First, I needed some flowers to cover the defects in the basket.

I cut out a bunch of small purple flowers then came along with a little wooden ball tool to poke a shape into the flower.


I left the flowers drying into that shape, and once they dried, I came with the Tip1 and made little dots inside the flower as stamen.


There were also little green leaves that got glued on behind the flowers. Those were made using cutters (I'm not THAT artistic now. I wish I was though. Then I could get a knife and cut perfect leaves out of fondant =D)


And of course, the magic of cakes and fondant is that whenever there's a mistake, you just use some other piece of decoration to cover it up. So whenever there was a line that was too wiggly or didn't meet with the next part, I put a flower over it to cover the imperfection.


By using pretty decorations, we can make imperfections look perfect (:


But even as lovely as the sides look, we need to make the top look a little less bland, because even as delicious as that ganache looks, it's not Easter-y/springy enough. So the solution is....


Daisies (: Now here's something you should know. I LOVE daisies****. Especially when they're fondant. I have nothing against real daisies or other fondant flowers, but there's something about fondant daisies that is just very appealing to me. I don't know if it's how cutadorgeous***** they are, or how easy they are to make, or how easily they fit in with other flowers, but they're just awesome.

Now these four were pre-made (by me, not a store). I don't know why, but every time I make daisies, there always seems to be a leftover or two (or in this case 4). But still, these four weren't enough so I went and made lots more.


I cut the daisy shapes out from the white fondant and put them to dry on those spoons and white shaping cups (both meant to shape the flowers, just in case you didn't catch that). Once they dried, I created the center part with yellow icing again.
I ended up using a different daisy shape than last time to shape the daisies, so I had multi-sized daisies (which worked out great).


After making the flowers, I just arranged them nicely on the cake.
I put a big daisy in the center with lots of little daisies surrounding it.


That was the main focus for the cake, then I just went along the border with the rest of daisies, still creating an appealing look by spacing out the big daisies among the small daisies.


And of course, I also used those lovely daisies to cover a few imperfections, which most certainly were not as bad as the ones on the sides.


This was our final Easter/spring cake (:
My family had the pleasure of eating this 4 layer chocolate, yellow, chocolate, yellow, ganache-filled flower basket. Not that the kids needed anymore chocolate... They certainly got more than enough chocolate to last them the rest of the year. Eh, but hey, it's Easter. Enjoy yourselves (:


*If you're not acquainted with icing numbers, then this probably makes no sense to you. But for now all you gotta know is that different tips create different designs. I might or might not explain them better later.
**If you don't like my instructions, you can see Wilton's here.
***Well, if I'm making a basket I might as well put flowers in it (:
****What isn't cute about this???
I don't think they're as cute as the fondant ones, but they're still adorable in real life.
*****Cute, adorable, gorgeous

Yes, I do realize that this was posted the day after Easter, but I was busy feeding little kids chocolate-yellow-chocolate-yellow ganached cake on Easter, so the post had to wait one day.